TechyVerse MCP: The Complete Setup Guide for AI Agents
Learn to connect TechyVerse MCP with Claude, Gemini & Cursor. Master OAuth, agentic AI workflows, and automated publishing. Get started for free today.

Sohail Shaikh
Author
Introduction
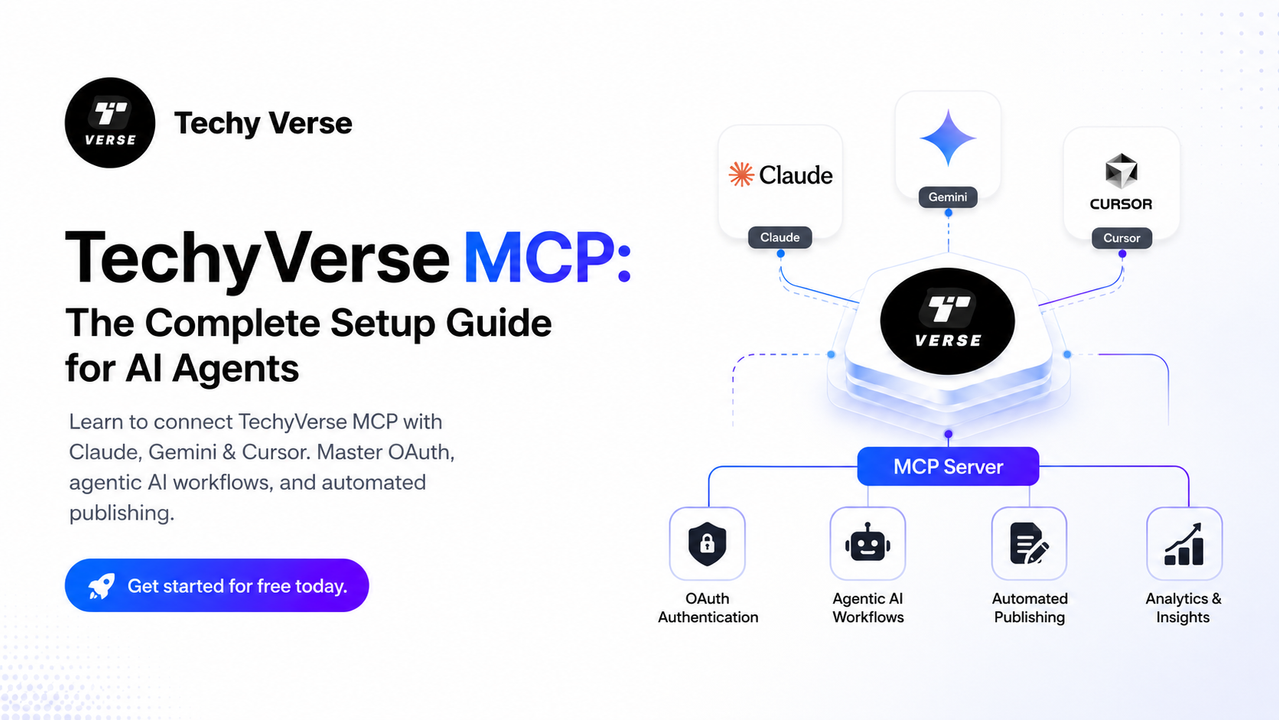
The Model Context Protocol (MCP) is the backbone of modern agentic workflows. It gives AI agents — Claude, Gemini, Codex, and others — a standardised, secure channel to interact with external systems using nothing but natural language. TechyVerse ships a first-class MCP server that lets you manage your entire blog lifecycle without ever touching the dashboard.
This guide walks you through every connection method, explains how the agentic workflow operates under the hood, and gives you a ready-to-use command reference so you can go from zero to fully automated publishing in under ten minutes.
What Is MCP and Why Does It Matter?
MCP (Model Context Protocol) is an open standard that defines how AI clients communicate with external tools and data sources via JSON-RPC. Think of it as a universal adapter: your AI assistant speaks MCP, and any service that exposes an MCP endpoint instantly becomes part of the agent's capability set.
For TechyVerse, this means your AI can:
- Read your existing drafts and published posts.
- Create, edit, and optimise new content.
- Run SEO audits and apply metadata — all in one conversational turn.
- Publish or schedule posts directly from the chat window.
The TechyVerse MCP server is available at the following endpoint:
https://www.techyverse.in/mcp
Architecture Overview
Before diving into setup, it helps to understand the three-layer architecture that makes TechyVerse MCP secure and scalable.
Client Layer (Claude / Gemini / Cursor)
          │
          │  JSON-RPC over HTTP (Streamable or SSE)
          ▼
Transport & Auth Middleware (OAuth 2.0 / Bearer Token)
          │
          │  Verified identity passed downstream
          ▼
Data Layer (Supabase + Row Level Security)
Client Layer — Your AI tool. It sends natural language instructions that are translated into structured MCP tool calls.
Transport & Auth Middleware — Every request passes through OAuth 2.0 or a Bearer token check. No request reaches the database without a valid, scoped identity.
Data Layer — Supabase with Row Level Security (RLS) enforced at the database level. Even if middleware were bypassed, RLS ensures agents can only read and write records they are authorised to touch.
Connection Methods
Method A — Zero-Config OAuth (Recommended)
This is the easiest path. Your AI tool opens a browser tab, you log in with your TechyVerse credentials, and the token exchange happens automatically.
Claude Desktop
- Open Claude Desktop and navigate to Settings → Connectors.
- Click Add Custom Connector.
- Enter the URL:
https://www.techyverse.in/mcp - Claude detects the OAuth server automatically and launches the browser login flow.
- Approve the permissions, and the connector is live.
Claude.ai (Web / Mobile)
- Go to Settings → Connectors inside Claude.ai.
- Click Add MCP Server and paste
https://www.techyverse.in/mcp. - Complete the browser-based OAuth flow.
Gemini CLI
Add the following block to ~/.gemini/settings.json:
{
  "mcpServers": {
    "techyverse": {
      "httpUrl": "https://www.techyverse.in/mcp"
    }
  }
}
Then authenticate inside the CLI:
/mcp auth techyverse
Codex CLI
Option 1 — single-line add:
codex mcp add techyverse --url https://www.techyverse.in/mcp
Option 2 — manual config.toml:
[mcp_servers.techyverse]
url = "https://www.techyverse.in/mcp"
Then run codex mcp login techyverse to complete authentication.
Method B — Claude Code (Terminal)
If you are working inside the Claude Code CLI, one command is all you need:
claude mcp add techyverse --scope user --transport http https://www.techyverse.in/mcp
The CLI handles the OAuth handshake and opens your browser automatically. No manual token management required.
This makes it:
- Available in every Claude Code session
- Across all projects/workspaces
- Stored in user config instead of project config
Without --scope user, it only works inside the current project folder.
Method C — Manual Bearer Token (Advanced / Remote SSH)
Use this method when your environment does not support browser-based login (headless servers, CI pipelines, remote SSH sessions).
- Sign in at
https://techyverse.in/login. - Navigate to Settings → MCP Access Tokens.
- Click Generate Token and copy the value immediately — it is shown only once.
- Add the token to your tool's HTTP header configuration:
| Header Key | Header Value |
|---|---|
Authorization | Bearer YOUR_TOKEN_HERE (replace with the token generated in your dashboard settings) |
Security tip: Treat your MCP token like a private key. Store it in a secrets manager (e.g.,
1Password, GitHub Actions Secrets) and never commit it to source control.
Method D — Cursor IDE
- Open Settings → Cursor Settings → Tools → MCP.
- Click + Add New MCP Server.
- Fill in the fields:
- Name:
TechyVerse - Type:
streamableHttp - URL:
https://www.techyverse.in/mcp
- Name:
- Click Save. Cursor will validate the connection automatically.
The Agentic Workflow: Discovery → Reasoning → Action
Once connected, your AI agent operates in a three-phase engine that mirrors how a senior editor thinks.
Phase 1 — Discovery
The agent reads the TechyVerse content standards using get_content_guide, checks available categories via list_categories, and reviews recent posts with list_recent_posts. It now has full situational awareness of the platform's rules, tone, and SEO requirements before writing a single word.
Phase 2 — Reasoning
With the rules internalised, the agent uses its native LLM intelligence to:
- Draft content that matches the TechyVerse voice (professional, action-oriented, developer-to-developer).
- Run an internal 100-point editorial audit against grammar, structure, and technical accuracy.
- Generate a meta description that is strictly between 150–160 characters and includes a call to action.
- Select 5–8 high-signal tags (e.g.,
Node.js,Agentic AI) instead of generic ones.
This is the key architectural shift: the reasoning is not a server-side black box — it runs inside the LLM itself, making it transparent, inspectable, and infinitely extensible.
Phase 3 — Action
With a quality-verified draft and optimised metadata, the agent calls create_post to save the draft, then publish_post to push it live. Every state change is gated by the Supabase RLS layer, ensuring the agent cannot exceed its authorised scope.
Complete MCP Tool Reference
Discovery & Research
| Tool | What It Does |
|---|---|
techyverse_status | Check server health and active environment. |
get_site_info | Fetch site branding, name, and metadata. |
list_categories | View valid post categories. |
get_content_guide | Read the full editorial and SEO standards. |
list_recent_posts | See what was recently published on the platform. |
search_posts | Find existing posts by title keyword. |
get_post | Retrieve the full Markdown content of a published post. |
Content Lifecycle
| Tool | What It Does |
|---|---|
create_post | Start a new draft with title, content, and metadata. |
update_post | Edit content, slug, tags, or description on any post. |
set_cover_image_url | Set or replace the post header image. |
publish_post | Move a draft to live/published status. |
schedule_post | Set a future publishedAt date for delayed release. |
delete_draft | Safely remove an unpublished draft only. |
delete_post | Force-remove any post (draft or live). Use with caution. |
Workspace Management
| Tool | What It Does |
|---|---|
get_my_profile | Check your author role and MCP permission scope. |
list_my_posts | List your posts filtered by draft, published, or scheduled. |
The Golden Path: End-to-End Publishing Workflow
Follow this four-phase sequence to produce publish-ready content with zero manual steps.
Step 1 — Deep Draft
"Create a new TechyVerse draft titled 'Mastering RAG Pipelines with LangChain'.
 Read the content guide first, then write a 1200-word article covering
 vector stores, chunking strategies, and retrieval evaluation metrics."
The agent calls get_content_guide, drafts the article in correct Markdown with proper H2/H3 structure, code blocks with language tags, and inline code formatting, then calls create_post.
Step 2 — Quality Audit
"Audit my latest draft against the TechyVerse editorial standards.
 Use a 100-point rubric covering grammar, technical accuracy,
 structure, and voice consistency."
The agent fetches the draft via list_my_posts, runs its internal reasoning audit, and returns a scored report with actionable fixes. If the score is below threshold, it calls update_post with the corrected content automatically.
Step 3 — SEO Optimisation
"Optimise the SEO for my draft on RAG Pipelines.
 Generate a meta description (strictly 150-160 characters) and 5-8 tags."
The agent applies the metadata via update_post after generating a meta description that includes the primary keyword and a call to action — all within the character budget.
Step 4 — Production Deploy
"Set a cover image from Unsplash and publish the post."
The agent calls set_cover_image_url with a relevant Unsplash URL, performs a final pre-flight check against the quality checklist, and calls publish_post. The article is live.
Security & Zero-Trust Model
TechyVerse MCP is built on a zero-trust foundation. The security model has three independent layers, each of which can stop an unauthorised action independently.
Layer 1 — Transport Authentication. Every MCP request must carry a valid OAuth token or Bearer token. Unauthenticated requests are rejected at the edge with 401 Unauthorized.
Layer 2 — Session Scoping. OAuth tokens are scoped to the authenticated user's identity. An agent operating as User A cannot call tools that affect User B's content, even if it tries.
Layer 3 — Supabase Row Level Security. RLS policies are enforced at the PostgreSQL level. They are the final arbiter of truth. Even a direct database connection bypassing the API layer cannot read or write rows outside the policy scope. This means:
delete_poston another user's post → silently returns zero rows affected.update_poston an unauthorised slug →403 Forbiddenbefore the query executes.
This architecture ensures that AI agents are powerful but bounded — they can do everything an authorised human editor can do, and nothing more.
Example Natural Language Commands
Once connected, these prompts work out of the box with any MCP-compatible AI agent:
"Show me my recent TechyVerse posts."
"Create a new draft titled 'The Future of AI Agents' with placeholder content."
"Check the quality of my latest draft and list improvement tips."
"Optimise the SEO for post ID [ID], then publish it."
"Schedule my RAG Pipelines post to go live next Monday at 9 AM."
"Delete my draft with slug 'old-test-post'."
Conclusion
TechyVerse MCP turns your AI assistant into a fully capable editorial partner. The connection takes under ten minutes regardless of your tool of choice, and the agentic workflow that follows eliminates the manual overhead of drafting, auditing, and optimising content — without sacrificing the quality standards that make TechyVerse a trusted platform for developers.
Connect your agent, run the Golden Path workflow once, and manual publishing becomes the slower option.
Join the Verse
Get exclusive insights on Next.js, System Design, and Modern Web Development delivered straight to your inbox.
No spam. Unsubscribe at any time.